
First, I wanted to tell you about a pretty neat little 'event' of sorts from Zoya Nail Polish. If you click on this link and sign up ( for free ) it will give you a voucher for a free Zoya Polish, and if you add 2 more polishes the shipping is free. The shipping regularly is like 7$, So its like the cost of the nail polish to ship, but if you have the money to buy the other 2 I think its totally a deal. Hubby said I might be able to buy some this weekend. But I think I saw on the webite it was good until April or something. I think I will have to go look again because I really love these polishes and their practices ! I got a few Zoya colors from the Copious thing. At least one of them should be coming today. I walked to the mail box in the rain with my dog I was so excited, only to see the mail hasn't ran yet. WHY OH WHY MAIL DO YOU WAIT SO LONG TO COME TO ME! Everyone I know gets their mail at like 11 in the morning. I don't get mines till like 5- hubby laughed when I texted him to tell him, He said 'lol babe the mail doesn't come till like 430-5 now' WHAT?!! Ridiculous.
Ok.. So, onto the tutorial. Are you as excited as I am ?
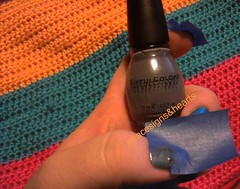
First choose your colors- I chose Essie-Beach bum blu for the nice blue to be the ocean water, Sinful Colors-slate ( This would have been better mixed maybe with a little bit of silver or a little less dark grey ) for the shark body and fins, LA Colors-white for the teeths and the eyeballs. ( LA Colors is also a cruelty free brand and I got this at the Dollar Tree by my house! ), Zoya- Gia for the red, bloood part, and OPI- gone gonzo for the glitter over the blue! You will also need some blue painters tape and a pen (you can also use a nail polish pen thingie but I could only find one at Walgreen and it was 9$. No thanks), to draw the shark and fin, and scissors to cut the drawings- remember to have the tape larger than your nail for easy peel off.
First, paint your nails your blue base color. Let it dry well.

Then you will draw on your painters tape. ( I am not a great drawer so my shark is kind of demented, but I think for free hand its pretty good!! ) I only did my left hand since it would be way too hard to do both hands.

Now take the grey color and paint, let dry pretty good and remove the tape.
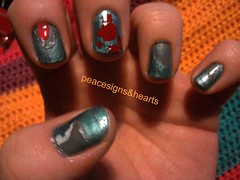
I painted my middle finger nail with splotches of red to look like blood! Making sure that my grey color is dry, I put some white dots on the grey open mouth part to look like teeth. My pointer finger is supposed to be a shark comming up from water with its mouth open but it didn't work out as well as I would have liked.

Let everything dry really well, take the blue glitter and paint over the blue parts you want to sparkle like water! Let dry, and you are so done. And you have a wicked awesome Shark Week Manicure!

I hope you enjoyed my tutorial! I would love to see yours if you followed my tutorial! You can email yours to me at peacesignhearts@gmail.com and I will post them on here! Thank you so much for reading! Have a happy Shark Week!!
Ps. That bright, pretty crochet in the back is the bag that I am working on! :DD
xxooo
Pan
No comments:
Post a Comment